


The materials you need are shown below; a rotary cutter, ruler, and cutting mat would also come in handy. The square on the right was made with this tutorial.

Glue stick, scissor, paper, fabric, circle template. Choose two contrasting fabrics for this project. I prefer card stock paper so it can be re-used, but normal weight paper would work as well.

1. Cut your paper and your background fabric the same size - I chose to make 7" squares for both.

2. Trace a circle on your paper. Center your circle as much as possible. Cut out the circle.

3. Put a dab of glue at each corner of your paper. Sorry about the horrible picture.

4. Place your fabric on the paper (right side up) and pin at each corner. The glue and the pins should hold it in place.

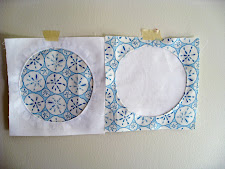
5. Cut out the interior of your circle leaving at least 1/2" from the edge of your fabric to the edge of the paper. It should look like this. Don't worry about making it perfect - it really doesn't mattter.

6. Cut into your fabric all the way around the circle as shown above. Leave about 1/8" - 1/4" between your fabric and paper. Along the dotted line rub the glue stick very sparingly. Mostly just dotting in places. You'll understand this better in the next step.

7. Now iron the cut edges back along the paper. You are looking at the paper and the backside of your fabric.

9. Remove the paper. This is the reason you wanted to glue along the edge as sparingly as possible. Once the paper is removed, iron the little tabs of fabric back down.

10. Cut out the fabric for your circle (the white fabric). Make it another 7" square - it doesn't need to be perfect since you are going to be removing a bit of it later.

11. First pin the fabrics together. Make a sandwich; on the bottom is your circle fabric (the white) right side up, and then your background fabric (the sand dollars) on top of it with its right side up - it should look like the picture in step 10, except the white is now cut into a 7" square. Now sew along the edge of your circle - the sewing foot should be on the background fabric - 1/4" from the circle's outer edge. You are sewing your square right side up when you are doing this step.

12. Flip your square over. Cut away your circle (the white) fabric - leaving about 1/2" of fabric.

All done! Perfect circles every time.

I made this fish with the method above. I hope you found this tutorial use-able. Please comment with any questions you have. Thanks for looking! martha
This is linked to:


Oooh that's a geat technique! Thanks for sharing it, I had done the applique version, but I'm going to try this too!
ReplyDeleteThat is so clever! I've only tried to do circles with applique, so I am definitely going to try this. Thanks for the tutorial!
ReplyDeleteI'm hosting a party and would love to have you come over and link this up!
http://mybackyardeden.blogspot.com/2010/02/make-it-yours-day_17.html
Wow - love that quilt!
ReplyDeleteThanks so much for linking up to Make it Yours day! This technique is definitely on my to do list!
ReplyDeleteThanks again!